How to import your certificate to the browser and save a back-up copy for Google Chrome
This user guide has been prepared using Google Chrome 140.0.7339.186. The screenshots and other details may differ if you use another version of the browser.
After you pickup a WIPO CA certificate and downloaded it to your computer, these are the steps to follow for importing it to your browser to complete the installation of the certificate:
1. Open Google Chrome, click the Customize and control Google Chrome menu (the three vertical dots at the upper right corner ) > go to Settings > at the left margin, click Privacy and security > click Security.

2. Under Advanced, click Manage certificates.

3. At the left panel, click Your certificates > Manage imported certificates from Windows > at Personal > click Import.

4. The Certificate Import Wizard starts. Click Next.

5. Click Browse to navigate to the location where your certificate file is stored. If you don’t remember the location of the certificate, search for files with the extension .p12 or .pfx.

6. Select the file that you want to import (make sure to choose the option Personal Information Exchange (*.pfx; *.p12) or All Files to see those with the file extension .p12 or .pfx) > click Open.

7. Click Next.

8. Enter the password which was given at the Install certificate page (at the time to pick up your certificate) and tick all three checkboxes > Next.

9. Tick the second option (if not yet tick, click Browse) and click Next.

10. Click Finish.

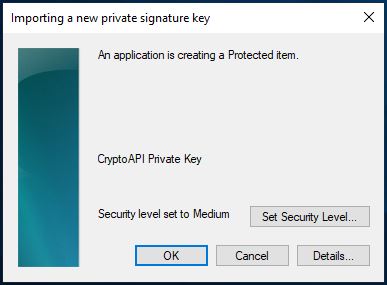
11. The security level is set to Medium by default, click OK.
12. Click OK.

13. Your digital certificate is now visible in the Google Chrome certificates list and ready for use. Click Close to finish the import.

To save a back-up copy of the certificate and create a new password:
After your certificate has been imported in to Google Chrome, you can save a backup copy of the certificate and create a password of your choice which is different with the default one and easier for you to remember. In addition to import the certificate into your internet browser after the pick-up/ retrieval, there may be a number of reasons for importing a copy of a WIPO Customer CA digital certificate, e.g. for enabling access to ePCT with strong authentication after a computer or a browser change or upgrade.
14. Select the certificate on the Certificate Manager window, click Export. Refer to the Step 1-2 above to find the certificate in your bowser if needed.

15. On the Certificate Export Wizard, click Next.

16. Select "Yes, export the private key", click Next.

17. Tick all three options below, including "Export all extended properties", click Next.

18. Tick the box next to Password, create the password of the backup copy and click Next.
This password is required when you import the certificate into a different browser or when re-importing the certificate after a browser upgrade.

19. Click Browse.

20. Choose a location to save the back-up copy of your certificate. Type a name for your certificate backup copy (e.g. MyWIPOCert); the file extension (.pfx) will be added automatically. Click Save.

21. Click Next.

22. Click Finish to complete the export of the backup copy.

23. You will receive the confirmation "The export was successful". Click OK to close it.

The backup copy is now stored. You will need it in case of a computer or a browser change or upgrade to import in to the browser that you intend to use for accessing ePCT. It is also recommended to send your certificate to yourself by email in order to always keep a copy outside of your computer.
Next: How to remove your certificate from the browser: Google Chrome